SCIENCE FUN ARTS
  • Home
    • About
    • Gallery >
      • Covers
      • Graphical Abstracts
      • Fun Artwork
      • Animations
      • Thesis Covers
    • Friends
  • Science
    • Figures
    • Articles
    • Presentations
    • Supervision
    • Reviews
    • PhD thesis
    • Hypes
  • Fun
    • Party
    • Laptop DJ
    • Music Video
    • Aquaria
    • Bicycling
    • Fun Music
    • When the fun is over
  • Arts
    • Images
    • 3D objects
    • Animations
    • Picture Modifications
    • Gifs

Picture modifications
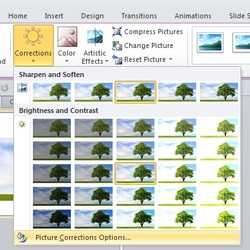
Picture

Before you start

Here we demonstrate how to modify images in PowerPoint. This can be useful when you want to slightly enhance a picture without re-doing the entire image. Alternatively, this can be used to further enhance the possibilities in PowerPoint to make your designs. In this part, occasional reference is made to earlier tips & Tricks for images.
Go to tips and tricks for images

Contrast, Brightness, and Sharpen

A very basic modification is to enhance the brightness, contrast, and sharpness of your picture. This is easily achieved in the Format tab, at 'Corrections'.
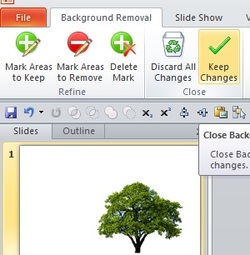
Picture
Picture

Background removal

Another instrumental action is to remove the background from images. Although such action can be more professionally done in programs like Gimp and Photoshop, PowerPoint has two main features to do the same. The first is the 'remove background' in the Format tab. If your background is very chaotic you can use the markers to indicate what stays and what goes.

Set transparent colour

​In the case the background has a single colour, the option 'set transparent colour' in the Colour button may be useful. With this option a single click can remove the background. However, in many cases even images that appear to have only one colour background, often possess 2 or 3 shades. In this case the option does not always work well. 
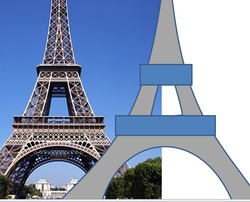
Picture
Picture

Digitalize existing designs

When low on inspiration: it is remarkably easy to look up a relevant example image from the web, and then to copy its main features using the PowerPoint tools. For example, the Eiffel Tower can be easily copied this way.
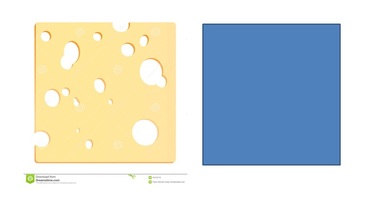
Fill with image

A simple way to give objects a certain look is by filling them with an picture. To do this a few aspects deserve attention which are disclosed below. We will be doing this by giving a square the look of a cheese with holes.
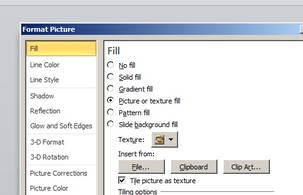
Picture

Choose file

The first step is to go to the 'format picture' options and go to the 'fill' tab. There you can select an image which you should have saved previously. In this case we will be filling the blue square with the image of the cheese.
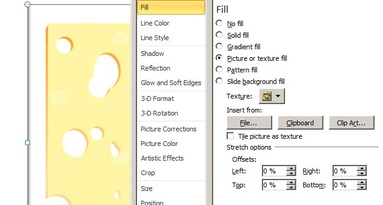
Picture
Picture

Off sets

Often your image will not fit nicely inside your shape. To make it fit perfectly, play with the 'Off set' options. In the case you need to crop a bit of the image (as in the example), you need to use negative percentages. This option can also be used to optimize the aspect ratio of the filler image.
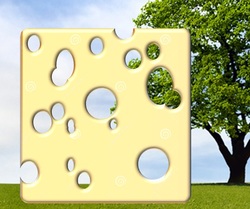
Exploit your image!

With your picture nicely embedded in a shape, you can start playing with any nice effects. Using the bevel options and the 'shape subtract' we can make the cheese come to life and add a valuable see-through effect.
Picture

www.sciencefarts.com is always expanding. More cool stuff coming soon!

Copyright Science Fun Arts© 2022
  • Home
    • About
    • Gallery >
      • Covers
      • Graphical Abstracts
      • Fun Artwork
      • Animations
      • Thesis Covers
    • Friends
  • Science
    • Figures
    • Articles
    • Presentations
    • Supervision
    • Reviews
    • PhD thesis
    • Hypes
  • Fun
    • Party
    • Laptop DJ
    • Music Video
    • Aquaria
    • Bicycling
    • Fun Music
    • When the fun is over
  • Arts
    • Images
    • 3D objects
    • Animations
    • Picture Modifications
    • Gifs